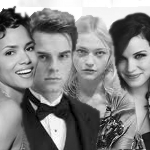
Hogwarts Regenerated

Hello and welcome to Hogwarts Regenerated. We have moved over to http://z13.invisionfree.com/HogwartsRegenerated/index.php? come join us!!

Join the forum, it's quick and easy

Hogwarts Regenerated

Hello and welcome to Hogwarts Regenerated. We have moved over to http://z13.invisionfree.com/HogwartsRegenerated/index.php? come join us!!

Hogwarts Regenerated

Would you like to react to this message? Create an account in a few clicks or log in to continue.

The new generation of witches and wizards has come. Whose side are you on?


5 posters

    a graphic tutorial by lena - all colour fills!

    Rora
    Rora
    Fifth Year Prefect
    Fifth Year Prefect


    Posts : 3663
    Join date : 2011-12-10
    Age : 25
    Location : dead before the day is done

    a graphic tutorial by lena - all colour fills! Empty a graphic tutorial by lena - all colour fills!

    Post by Rora Tue Jul 10, 2012 12:53 pm

    From a graphic tutorial by lena - all colour fills! X1b4q to a graphic tutorial by lena - all colour fills! ZCUc9


    *This tutorial is best for Dark/Medium images. Just so you know.

    Now, it looks pretty difficult to get that effect, but assuming you have a basic understanding of how GIMP (Not sure if you can do this with Photoshop 'cause I don't have it anymore) works, it's pretty easy! Here's how:

    1) Open your image. Crop it, sharpen it, do whatever you need first; in graphic making, colouring is always second-last. (Not important chizz: The order is usually base, model, colouring, text. But if you're good enough you can swap them around.)

    2) Create a New Layer (Shift + Ctrl + N). Now, go to the Bucket Tool and fill the layer with the colour a0bde5. Set the layer mode to Soft Light and opacity 100%. (Depending on your image, you might want to lower it down to 80%)

    3) Create another New Layer. Fill the layer with the colour ab120a and set the layer mode to Lighten Only. The opacity I used was 55.7%, but feel free to hitch it up to 75% or as low s 50% depending on how red you want your image to look.

    4) Create a third new layer. This layer will define the warmth of your image, so make sure you choose the right opacity. Fill it with the colour e5df47 and set the layer mode to Multiply, opacity 30%.

    5) Create a new layer, fill it with 252525 and set Layer Mode to Overlay. I left the opacity at 100%, but if your image looks too dark, lower the opacity down, but not too much so that it looks too bright; we'll brighten it up in the next later.

    6) Make a new layer, colour bab3ab and set it to Grain Merge 50%.

    7) Optional: If you want to have a lighter bit at the top and darker than the bottom, then watch this step. This is also pretty complex. Create a new layer, but don't go for the bucket fill. Go for the Gradient Tool (The square with the left at the side and the white at the left.) instead. Right. Set your gradient to Default and from the bottom centre, drag your mouse to the top centre of the picture. (Tip: DON'T LET GO.) Set the layer to Screen at 45%.

    And you're done! Show me your results, lovelies! <3
    danie
    danie
    Fifth Year Prefect
    Fifth Year Prefect


    Posts : 698
    Join date : 2011-12-28
    Age : 31

    a graphic tutorial by lena - all colour fills! Empty Re: a graphic tutorial by lena - all colour fills!

    Post by danie Thu Jul 12, 2012 4:44 am

    just three words: i love it!
    Hazelle Bass
    Hazelle Bass
    Fifth Year Prefect
    Fifth Year Prefect


    Posts : 151
    Join date : 2012-02-07
    Age : 26

    a graphic tutorial by lena - all colour fills! Empty Re: a graphic tutorial by lena - all colour fills!

    Post by Hazelle Bass Thu Jul 12, 2012 6:22 am

    Hi genius.

    In the process of downloading GIMP, so I'll try this out soon.
    Florence Oberlin
    Florence Oberlin
    Fifth Year Prefect
    Fifth Year Prefect


    Posts : 35
    Join date : 2012-07-18

    a graphic tutorial by lena - all colour fills! Empty Re: a graphic tutorial by lena - all colour fills!

    Post by Florence Oberlin Mon Jul 23, 2012 7:10 am

    a graphic tutorial by lena - all colour fills! EkZ0q

    HOW DO YOU DO THIS.
    I added another red layer to make it pretty.
    HOW DO YOU KNOW THIS.
    Anna Tshering
    Anna Tshering
    Fifth Year Prefect
    Fifth Year Prefect


    Posts : 1052
    Join date : 2011-08-01
    Age : 25
    Location : dumping her feelings.

    a graphic tutorial by lena - all colour fills! Empty Re: a graphic tutorial by lena - all colour fills!

    Post by Anna Tshering Mon Jul 23, 2012 7:18 am

    Hannah, I've been at this for a little over three years. Razz Of course I know.

    iwcfhnoi2ueheriuhcnwiuenhcwiunrhcriuewhnciewnhrwogornuiwheoin WHY WHAT WHY.
    HOW DID YOUR FIRST SIG TURN SO PUUUUURDY?
    HANNAH GOTZ TALENT, NGL.

    Alright, I have to admit it looks really warm (and Flo's warm, so that's a great thing!), and I think you could have tried doing the gradient the other way around (black at the top, white at the bottom) but overall, amazing first siggy. Razz
    Florence Oberlin
    Florence Oberlin
    Fifth Year Prefect
    Fifth Year Prefect


    Posts : 35
    Join date : 2012-07-18

    a graphic tutorial by lena - all colour fills! Empty Re: a graphic tutorial by lena - all colour fills!

    Post by Florence Oberlin Mon Jul 23, 2012 7:23 am

    THAT IS NOT A VALID EXPLANATION, RORA.
    Lolok. It is.

    I can't edit it anymore, darn. Sad
    Anna Tshering
    Anna Tshering
    Fifth Year Prefect
    Fifth Year Prefect


    Posts : 1052
    Join date : 2011-08-01
    Age : 25
    Location : dumping her feelings.

    a graphic tutorial by lena - all colour fills! Empty Re: a graphic tutorial by lena - all colour fills!

    Post by Anna Tshering Mon Jul 23, 2012 7:56 am

    Did you save it as an xcf, hun? That way, you can edit it later. Smile

    Sponsored content


    a graphic tutorial by lena - all colour fills! Empty Re: a graphic tutorial by lena - all colour fills!

    Post by Sponsored content


      Current date/time is Sat May 11, 2024 9:07 pm